Core Building Blocks
The pieces that make this network secure
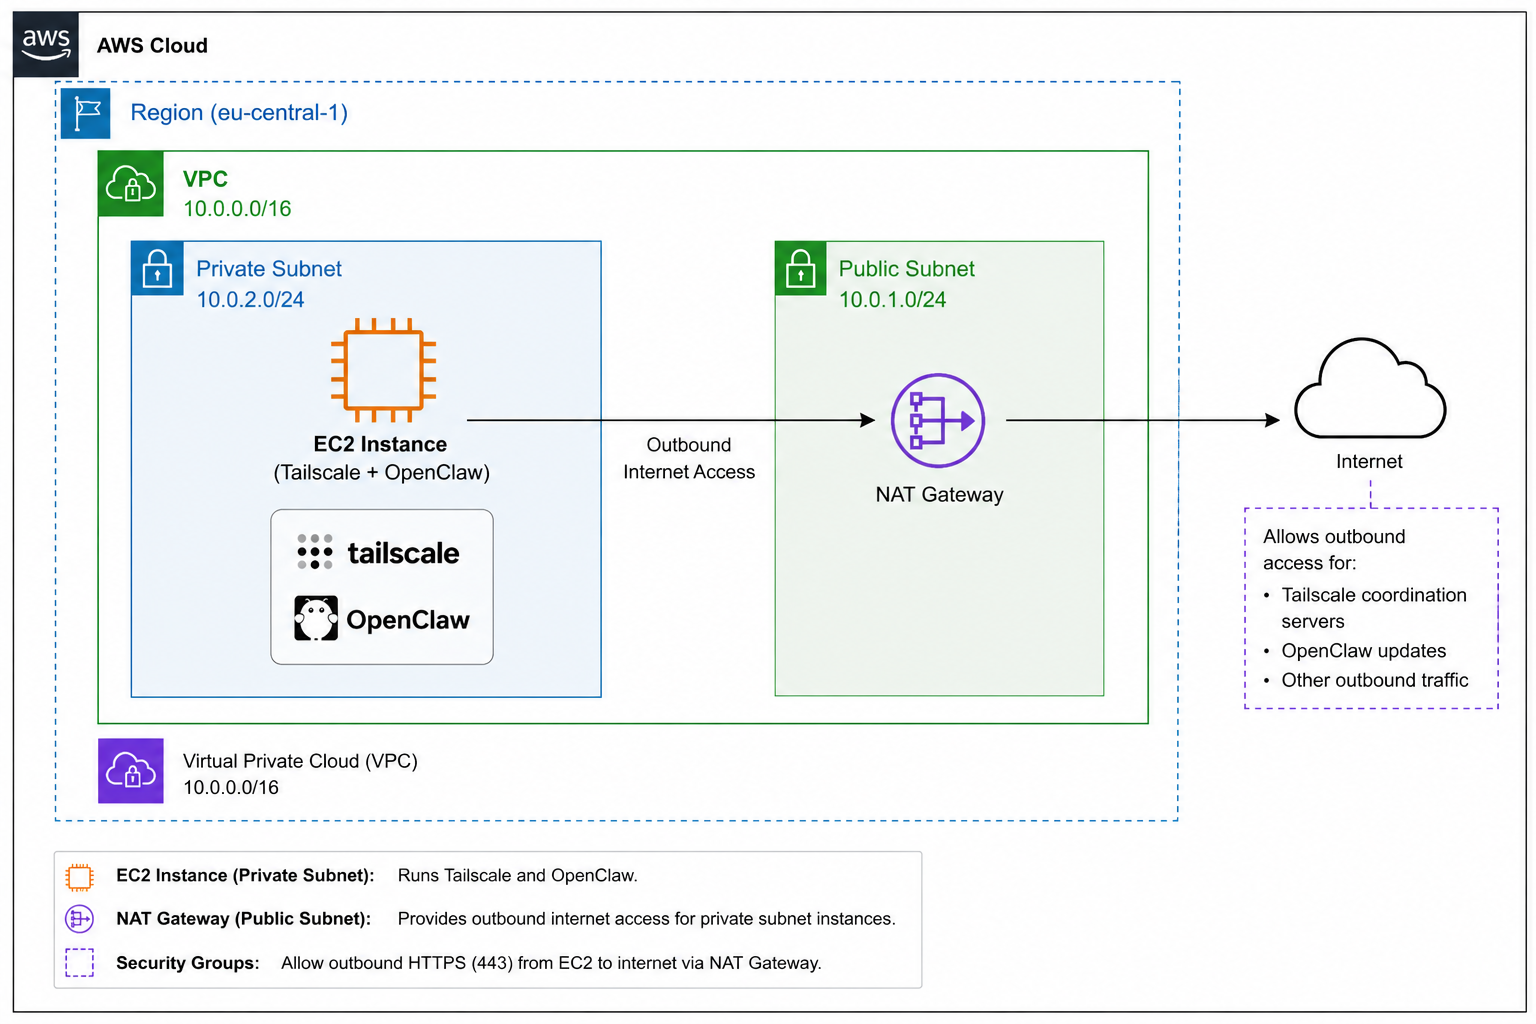
Each component plays one specific role. Together they form a textbook two-tier VPC: public for ingress/egress
plumbing, private for everything that runs your code.
VPC
Custom VPC — 10.0.0.0/16
An isolated network providing 65,536 private IPs. The boundary that nothing flows in or out of without an
explicit rule.
PUB
Public Subnet — 10.0.1.0/24
Routes 0.0.0.0/0 to the Internet Gateway. Hosts only the NAT Gateway — no workloads live here.
PRV
Private Subnet — 10.0.2.0/24
Routes 0.0.0.0/0 to the NAT Gateway. The OpenClaw EC2 lives here with no public IP attached.
NAT
NAT Gateway
Lets the private instance reach apt updates, package mirrors, and the OpenClaw installer —
without exposing it inbound.
SG
Security Groups
Stateful, instance-level firewall. Only outbound HTTPS (443) is allowed; inbound is closed except via
SSM/Tailscale.
TS
Tailscale + SSM
Two zero-trust paths to the box. SSM Session Manager via IAM, Tailscale via your tailnet — neither requires
open ports.
!
Why public vs private matters. A subnet is "public" only because its route table sends
0.0.0.0/0 through an Internet Gateway. The same subnet becomes private the moment that route points
at a NAT Gateway instead. Routing — not naming — is what defines the boundary.
Step-by-step
Building it from scratch
Thirteen steps from an empty AWS account to a private EC2 running OpenClaw, reachable only over Tailscale or
Session Manager.
1
Create the custom VPC
VPC → Create VPC
Name:      OCL-VPC
IPv4 CIDR: 10.0.0.0/16
Tenancy:   Default
2
Create the public subnet
VPC → Subnets → Create. Enable auto-assign public IPv4 — the NAT Gateway needs one.
Name: Public-Subnet-A
AZ:   eu-central-1a
CIDR: 10.0.1.0/24
3
Create the private subnet
Do NOT auto-assign a public IP. This subnet will hold OpenClaw.
Name: Private-Subnet-A
AZ:   eu-central-1a
CIDR: 10.0.2.0/24
4
Create and attach the Internet Gateway
VPC → Internet Gateways → Create, then attach to OCL-VPC.
Name: OCL-IGW
5
Public route table
Routes 0.0.0.0/0 through the IGW. Associate with Public-Subnet-A.
Name:   OCL-Public-RT
Routes:
  10.0.0.0/16 → local
  0.0.0.0/0   → OCL-IGW
6
Private route table
Initially has only the local route. Associate with Private-Subnet-A. We'll add the NAT
route after step 8.
Name:   OCL-Private-RT
Routes:
  10.0.0.0/16 → local
7
Launch the private EC2
Place it in the private subnet with no public IP. Security group: outbound HTTPS to
anywhere; inbound only via SSM / Tailscale.
Name: Web-Server (OpenClaw host)
AMI: Debian
Type: t2.micro
Subnet: Private-Subnet-A
Public IP: Disabled
Key: YOUR_KEY_NAME.pem
User Data for the private EC2
#!/bin/bash
apt-get update -y
apt-get install -y apache2 curl
TOKEN=$(curl -s -X PUT "http://169.254.169.254/latest/api/token" \
-H "X-aws-ec2-metadata-token-ttl-seconds: 21600")
PRIVATE_IP=$(curl -s \
-H "X-aws-ec2-metadata-token: $TOKEN" \
http://169.254.169.254/latest/meta-data/local-ipv4)
echo "Public Web Server Working - Private IP: $PRIVATE_IP" > /var/www/html/index.html
systemctl enable apache2
systemctl start apache2
cd /tmp
wget https://s3.amazonaws.com/amazon-ssm-us-east-1/latest/debian_amd64/amazon-ssm-agent.deb
sudo dpkg -i amazon-ssm-agent.deb
sudo systemctl enable amazon-ssm-agent
sudo systemctl start amazon-ssm-agent
sudo systemctl status amazon-ssm-agent
8
Create the NAT Gateway
VPC → NAT Gateways → Create. Place it in Public-Subnet-A and allocate
a fresh Elastic IP.
Name:        OCL-NAT
Subnet:      Public-Subnet-A
Elastic IP:  Allocate
9
Update the private route table
Now the private subnet can reach out — for apt updates, OpenClaw downloads, and
Tailscale coordination — without ever accepting inbound traffic.
Add route:
  0.0.0.0/0 → OCL-NAT
10
Connect via Session Manager
EC2 → instance → Connect → Session Manager. No SSH key, no open port 22 — just IAM.
EC2 → Private Instance → Connect → Session Manager → Connect
11
Install Tailscale on the instance
Adds the box to your tailnet so you can SSH from your laptop without exposing the
network.
curl -fsSL https://tailscale.com/install.sh | sh
sudo tailscale up
tailscale ip -4
12
Connect from your laptop
Once Tailscale is up on both sides, SSH flows over the tailnet — never over the public
internet.
ssh -i YOUR_KEY_NAME.pem admin@<TAILSCALE_IP_ADDRESS>
13
Install OpenClaw
The instance pulls the installer outbound through NAT. Nothing inbound is ever
required.
curl -fsSL https://openclaw.ai/install.sh | bash
$
Free Tier reminder. The EC2 (t2.micro) is Free Tier eligible. The NAT Gateway and its Elastic
IP are not — you'll pay an hourly + per-GB rate for as long as it exists. For lab use, destroy the NAT
Gateway when you're done and recreate it on demand.